
tCamView iOS Mobile App
Connect to tCam-Mini and then view, save and share images on your iPhone or iPad. Requires a device with iOS 11 or later. Find the app in the App Store.
See below for instructions how to configure and use the app. Contact me at support with questions, to report issues or to suggest features.
The app does not collect information. See the full privacy policy.
See below for instructions how to configure and use the app. Contact me at support with questions, to report issues or to suggest features.
The app does not collect information. See the full privacy policy.
Camera Screen
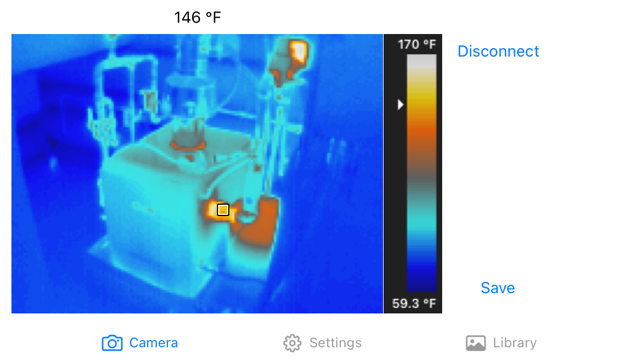
Connect/Disconnect - Controls connection to camera. Camera streams at maximum rate when connected.
Save - Saves the current image radiometric data to app's Documents folder (available through Finder). Radiometric data files are displayed in the Library Screen. Also exports a jpeg image to the device's Photos library if Export Picture on Save is enabled in the Settings screen.
Touching the top of the Palette bar will advance to the next palette. Touching the bottom of the palette bar will reverse to the previous palette.
Touching the image while connected sets the spotmeter position.
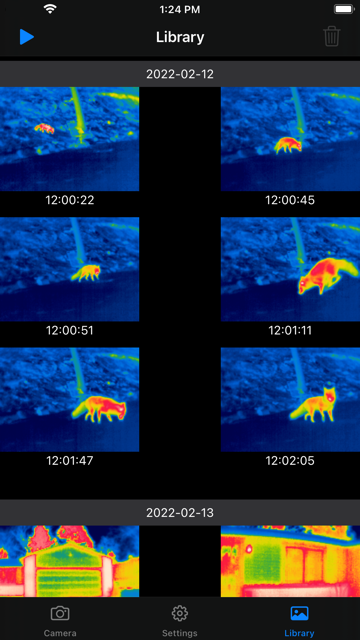
Library Screen
The Library Screen displays all saved radiometric image files. These files are stored in the app's private Documents folder and are available through Finder when the phone is connected to a computer. They are compatible with the Desktop application. These files will be deleted if the app is deleted.
Files names include the time the image was saved and this time is displayed under each image. Images are stored in subdirectories for each month and displayed by month.
One or more images may be selected by touching them. The Trash button becomes active when one or more images are selected and can be used to permanently erase them.
The Play button is used to Browse through larger versions of selected images (or all images if none are selected).
The last used Palette from the Camera Screen is used to display the Library images.
Browse Screen
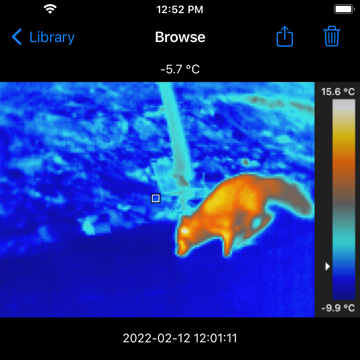
Swipe left and right to browse through the selected images.
Touch the top or bottom of the palette to change palettes.
Touch the Share button to export a jpeg image via the standard iOS Sharing mechanism.
Touch the Trash button to permanently erase the image.
Note that the spotmeter location may not be changed as it was the position when the image was saved (telemetry in the radiometric image file).
Settings Screen
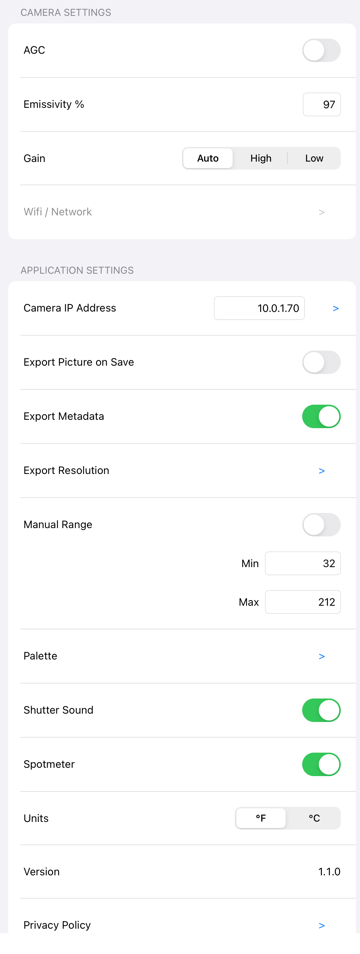
Camera Settings configure the camera's operating parameters. AGC, Emissivity and Gain are configured when the camera is first connected to the app or, if the camera is connected when the settings are changed, when moving from the Settings Screen back to the Camera Screen.
AGC toggles the Lepton AGC mode. Enabling AGC may result in images with more contrast but removes radiometric data. Disabling AGC configures cameras with Lepton 3.5 sensors to generate radiometric data.
Emissivity sets the Lepton 3.5 emissivity and should be a percent value between 1 - 100 for emissivity values of 0.01 to 1.0.
Gain sets the Lepton 3.5 Gain mode. Low Gain is useful for scenes containing very large temperature variations or extremes at the cost of temperature resolution. Auto works for most situations.
The Wifi / Network setting is only enabled when a camera is connected (see below).
Application Settings configure the apps operating parameters. Many application settings affect the display of images in both the Camera and Library Screens.
Camera IP Address tells the app what IPv4 address the camera is using. This will always be 192.168.4.1 if the camera is acting as an Access Point (AP). It will either be a DHCP served address or a fixed IPv4 address if the camera is a client to an AP. The app must be on the same network as the camera. The IP Address may be manually set or, for cameras running firmware with mDNS support, automatically discovered by clicking the ">" button.
Export Picture on Save configures the app to save both the radiometric data to the Library and export a jpeg image to the camera's Photo library when Save is pressed on the Camera Screen.
Manual Range allows fixing the range of temperatures used to scale an image (the numbers above and below the palette). This can be helpful to prevent radical images changes as the image is panned scenes with different temperature ranges.
Palette allows selecting the false color palette used to display images by name.
Shutter Sound controls the "camera sound" made when pressing the Save button on the Camera Screen.
Spotmeter controls display of the spotmeter in the image and the spotmeter temperature above the image in both the Camera and Browse Screens.
Units select the system for temperature display.
Camera List Screen
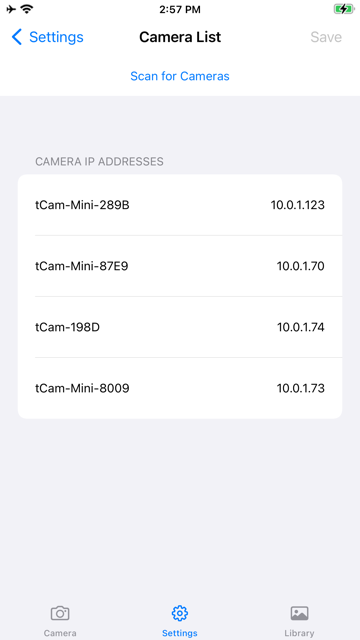
The Camera List screen is used to search the local network for cameras (tCam-Mini cameras running FW revision 3.0 and later, and all tCam and tCam-POE cameras). Clicking "Scan for Cameras" brings up a list of all devices on the local network. Select a device and click "Save" to set the Camera IP Address to that camera's address.
Note that occasionally the search won't find all cameras on the first scan. Clicking the scan button again will bring up the complete list.
Note that occasionally the search won't find all cameras on the first scan. Clicking the scan button again will bring up the complete list.
Wifi / Network Screen
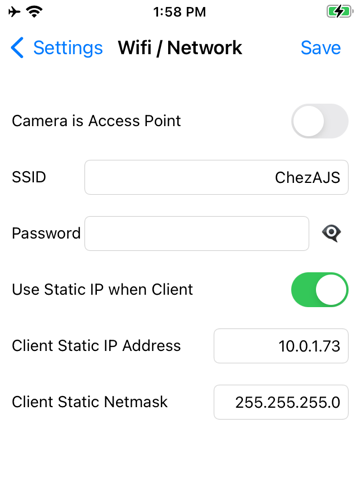

The Wifi / Network screen is used to configure the camera's Wifi settings and whether or not it has a static IPv4 address when acting as a client connected to another Access Point. For tCam-POE connected via Ethernet the Network screen allows configuring a static or DHCP served address. A static address can be useful so you always know how to connect to the camera.
The app must be connected to a camera to configure the Wifi or IPv4 address.
Camera is Access Point enables the camera to serve as an Access Point to which the phone will connect or allows the camera to connect to an existing Wifi network (for example a home or office network). Enabling the camera as an AP is useful when working away from other Wifi networks (for example when flying the camera on a drone in a remote location).
Camera's have a default AP SSID name (for example "tCam-Mini-XXXX" where XXXX are the last four hexadecimal digits in the camera's MAC address). However this can be changed using the SSID field. The camera's AP network may be run without a password by leaving the Password field blank or be given an 8-32 character password.
When connecting to an existing Wifi network, the network SSID is put into the SSID field (and the network's password entered into the Password field). SSIDs must be between 1-32 characters in length.
Static IP when Client should be enabled if you desire to give the camera a static address on an existing Wifi network. This is the address you enter into the Camera IP Address field on the Settings Screen (otherwise you have to enter the address given to the camera by your Wifi networks DHCP service).
Client Static IP Address is set to the desired camera address. Make sure this address is not currently in use on the network (often addresses with the final octet below some number are not assigned to other devices using DHCP).
Client Static Netmask is set to the network's netmask. Typically this is "255.255.255.0".
Use Static IP when Client, Client Static IP Address and Client Static Netmask are ignored when configuring the camera as an AP.
The Name field allows changing the camera name (tCam-POE).
Setting up the app and your Camera
By default WiFi based tCam cameras act as an Access Point with an SSID based on their type and the last four digits of their MAC addresses. In this mode they always have the IPv4 address of "192.168.4.1". Use your iPhone or iPad's Settings to connect the device to the camera's Wifi SSID to use the camera in this mode or to configure it to use another Wifi network. Enter "192'168.4.1" into the Camera IP Address field on the app's Settings Screen and then connect to the camera on the Camera Screen.
The camera may be configured to connect to an existing Wifi network using the app or the Desktop application. If the camera has already been configured to connect to another Wifi network using the Desktop application then the only thing to do to use it with the app is enter the camera's IPv4 address in the app's Camera IP Address field. If it has not been configured to connect to another Wifi network then the app can be used to configure it as follows.
- Configure the iPhone or iPad to connect to the camera's SSID using the device's Settings.
- Open the tCamView app and set Settings/Camera IP Address to "192.168.4.1" if it is not already configured.
- Connect to the camera from the Camera Screen.
- Open the Wifi / Network Screen from the Settings Screen.
- Deselect Camera is Access Point
- Enter your Wifi network's SSID and password
- Select Use Static IP as Client
- Enter the desired Static IPv4 address
- Click Save and then return to the Settings Screen. You should note the desired IPv4 address has been copied to the Camera IP Address field.
- Return to the Camera Screen to save the new settings and then close the app
- Reconfigure the iPhone or iPad to connect to the existing Wifi Network
- Reopen the tCamView app and you should be able to connect to the camera on the existing Wifi network.
Use the Scan For Cameras function on the Camera List screen to find the IP address of cameras on an existing network. For cameras that do not support (tCam-Mini running firmware prior to version 3.0), it can be helpful to run a utility program like Fing.