
Solar Powered Time-lapse Camera
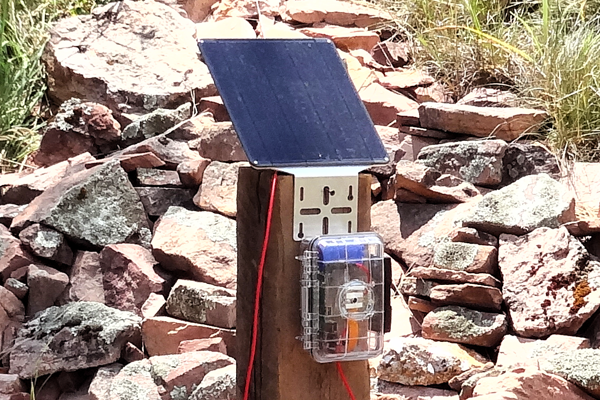
This project implements a solar powered time-lapse camera that takes a 1024 x 768 pixel jpeg photograph every five minutes and stores it to the Pi's Micro-SD Card during daylight hours. The real-time clock in the Solar Pi Platter is used to wake the Pi up to take a picture. Software on the Pi takes the picture using the raspistill program and then schedules the next picture by setting the Pi Platter's alarm before powering down again to save battery. It is ideal for use over long periods of time in remote locations where it will operate unattended.
The Solar Pi Platter lends itself very well to this application where the Pi is not powered on constantly and the solar panel has a chance to keep the battery charged despite occasional overcast or rainy skies. I ran my camera for a week and the battery was kept fully charged by a 9W panel the entire time.
The Solar Pi Platter lends itself very well to this application where the Pi is not powered on constantly and the solar panel has a chance to keep the battery charged despite occasional overcast or rainy skies. I ran my camera for a week and the battery was kept fully charged by a 9W panel the entire time.
Colorado Summer
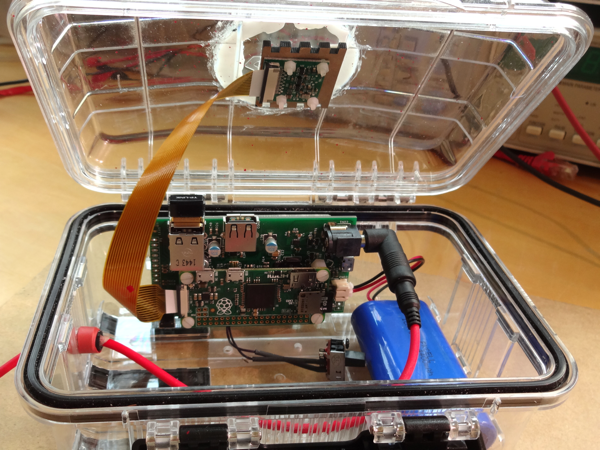
Inside
Components
In addition to the Solar Pi Platter, a Raspberry Pi Zero (either with or without built-in WiFi), Pi Camera and flex cable and an adequately sized Micro-SD Card (assume 2 GB for system software and then whatever storage you need for photographs), the following parts are also necessary. In addition I used some miscellaneous screws and 3M double-sided foam tape to hold the camera, Pi assembly and battery in place in the plastic enclosure. I also used shrink wrap tubing to make a grommet for the solar panel power cable and clear silicon window sealant.
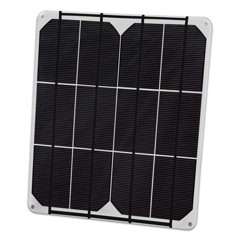
6V Solar panel. I used the Voltaic Systems 9W model. It might also be possible to use a 6W model in situations with a lot of sunlight. The Voltaic Systems' panels come with a long power cord and mounting hardware.
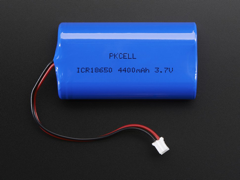
Battery. I used the Adafruit 4400 mAh battery pack. It might also be possible to use a 2200 mAh battery in situations with a lot of sunlight.
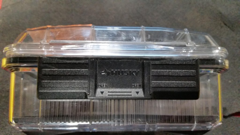
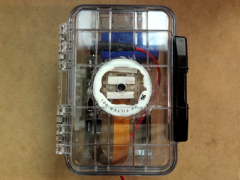
Enclosure. I used a Husky 7 inch waterproof storage bin I found at Home Depot.
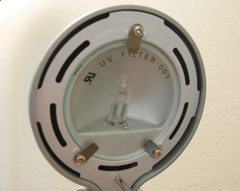
Camera cover. A hole is drilled in the enclosure for the camera since the enclosure's polycarbonate isn't clear enough for good photographs. I covered the camera hole with a UV filter from a dead halogen lamp I had laying around. However any clear plastic or glass could be used for this part.
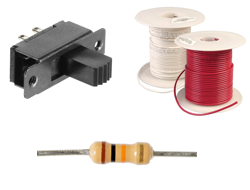
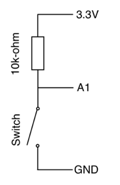
A small SPST switch, 10k-ohm resistor (1/4 watt) and thin (e.g. 28 AWG) hook-up wire.
Assembly
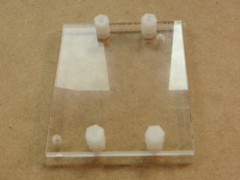
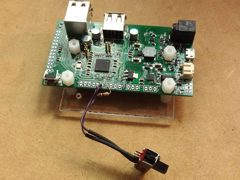
I used a small piece of acrylic to create a base for the Solar Pi Platter and 4-40 x 1/4 inch stand-offs and screws measured to fit the Pi's mounting holes.
The base will be attached to the side of the enclosure using foam-core double sticky tape.
The base will be attached to the side of the enclosure using foam-core double sticky tape.
Using the hook-up wire, connect the switch and resistor as shown to the Solar Pi Platter. The resistor connects between the Pi Platter's 3.3V output and A1 input. The switch connects between A1 and GND.
The switch is used to configure the operating mode of the system when it is powered on. With the power off:
The switch is used to configure the operating mode of the system when it is powered on. With the power off:
- Open the switch to configure the system as a time-lapse camera (which will take a picture, schedule a Pi Platter alarm for the next picture time and power down).
- Close the switch to configure the system to boot and remain booted (disable the time-lapse camera functionality).
Drill holes for the camera and solar power cable. The solar power cable hole should be large enough to thread the small male end through. I used several layers of shrink-wrap tubing on the solar power cable to create a grommet at the bottom of the enclosure.
Drill holes for the enclosure mounting screws (e.g. wood screws) in the bottom of the enclosure.
I attached the camera, Pi assembly and battery using foam-core double sticky tape that can be purchased at most hardware, grocery or drug stores. I had a laser-cut camera mount but the camera can be directly taped to the enclosure.

Use the sealant to glue the camera cover over the camera on the front of the enclosure. Be sure to make a waterproof seal but do not get any sealant on or over the camera lens.
Use the sealant to seal the solar power grommet at the bottom of the enclosure.
You may also want to tape over the mounting screws when the enclosure is mounted to prevent water from entering around the screws.
Use the sealant to seal the solar power grommet at the bottom of the enclosure.
You may also want to tape over the mounting screws when the enclosure is mounted to prevent water from entering around the screws.
Software Configuration
You will need to access the Pi to install and configure the software. It may be easier to do the installation before mounting the Pi assembly in the enclosure.
Afterwords a keyboard and monitor may still be attached with the enclosure open as shown. Be careful not to stress the camera cable.
Alternatively you can configure WiFi and ssh for remote access without a keyboard and monitor.
Note that you can attach a USB Power source (such as a phone charger) to the Solar Pi Platter to charge the battery inside. It's a good idea to start with a full charge.

While the stock Raspbian Lite image from the Raspberry Pi Foundation can be used, I like to use DietPi for applications like this. It's a stripped down version of Raspbian that boots faster, takes fewer resources, less space and most importantly uses tmpfs which reduces the likelihood of SD card corruption or wear-out. The following instructions are for a DietPi installation but are also applicable (perhaps with small changes) to Raspbian.
Install and configure the operating system (locale, timezone, keyboard, enable camera). Configure WiFi if you wish to remotely access the device (for example to offload photos). DietPi requires installation of ssh using the dietpi-software utility (it is already installed in Raspbian). I also add vim to DietPi but it includes nano for editing text files.
Create a repository for the pictures in /usr/local/pictures (sudo mkdir /usr/local/pictures).
Add the Solar Pi Platter software, talkpp and powerdown. talkpp is a utility program used to communicate with the Pi Platter (for example, to configure the alarm or get the time). powerdown is a script that configures the Pi Platter to turn off power in a few seconds and then issues the shutdown now command to the Pi for an orderly operating system shutdown and system power-off. These programs are put into /usr/local/bin as root (default in DietPi and with the sudo command in Raspbian) and make sure they are executable (sudo chmod +x /usr/local/bin/*)
Add the timelapse.sh script to /usr/local/bin to implement the camera's functionality. Make sure it has executable permissions (sudo chmod +x /usr/local/bin/timelapse.sh). Edit /etc/rc.local using nano, vim or the editor of your choice, so that the script is executed every time the Pi boots. Include the following lines before the exit.
# Start the photography script
# /usr/local/bin/timelapse.sh &
The latest versions of the Pi Platter software and the script may be found at the GitHub repository.
Setup
Make sure the Solar Pi Platter's real-time clock is set with the correct time. The Pi's clock should be set automatically if it is connected to a network or you can use the date command to manually set it. Once it is set, set the Pi Platter RTC with the talkpp -s command.
By default the timelapse.sh script starts taking pictures every five minutes at 5:30 AM and stops at 9:00 PM. These times may be changed by editing the script can changing the STARTOFDAY, ENDOFDAY or TIMELAPSE values. STARTOFDAY and ENDOFDAY are specified in 24-hour format: HHMM. TIMELAPSE is specified in seconds between photographs and shouldn't be less than 90-120 seconds or so since it takes time for the Pi to boot after power up, take the photo and then shut down.
Power down the system and install the camera enclosure and solar panel. The solar panel should be placed to maximize the amount of sun it receives. Make sure the switch is in the off (open) position and power-up the system by pressing the Solar Pi Platter power button. The Pi will boot and take the first picture and then power down. It will power back up TIMELAPSE seconds later for the second picture and so-on.
Pictures are stored as jpeg images in the /usr/local/pictures directory. Each picture has a filename based on the unix date string when it was taken: mmDDHHMMYY.SS.jpg.
Offloading Pictures
Pictures can be offloaded either using scp or by plugging a USB Stick into a Pi Platter USB port, mounting it and copying the photos to it. Be sure to turn the switch on (closed) before powering up the system to offload pictures. This powers up but does not take a photo and clears out any pending alarms.
I used a program called Time Lapse Assembler on a Mac to create a movie from individual photos.
I used a program called Time Lapse Assembler on a Mac to create a movie from individual photos.
Notes
- Lithium Ion batteries have a limited charging temperature range. If the time-lapse camera is to be used in temperatures below 0°C or above 45°C it is best to use a Lithium Ion battery with built-in 10k thermistor and connect that to the Solar Pi Platter thermistor input (remove J1). These can often be found on ebay as replacements for phones or tablets. This allows the Solar Pi Platter to protect the battery.
- The photo resolution (and other raspistill options) can be changed in the timelapse.sh script by changing the arguments to raspistill.
- A power-savings enhancement can be made by utilizing the Solar Pi Platter's ability to disable USB port power. The script can be modified to only power on the USB port a WiFi adapter is connected too (this only applies to the Raspberry Pi Zero, not the W model) if it is booting with the switch closed. You would need to set the default port state to off.